


Learning how to move Lightroom to a new computer might sound like a scary proposition to many photographers. But, since we change computers every three to five years, it is unavoidable. That is why I treat it as part of my photography workflow.
Since I started using Lightroom, I have migrated my Lightroom catalog at least four times. Today, I offer you my methodical, step-by-step approach..
First, I do not treat my Lightroom setup as a monolith installation; it is more like a multi-piece entity with its parts scattered across different corners of my computer.
Let me explain.
I keep my Lightroom installation with the master catalog, configuration files, and previews on my primary SSD (solid state drive) hard drive. It is extremely fast but relatively small at only 500 GB. This means that I cannot store my entire photo library (a total of 5 TB) next to my master catalog.
I have a conventional hard drive (8 TB) dedicated to my photo library.
Finally, I keep my Lightroom catalog backups on a separate hard drive where I store all my archived files and the resources I do not use on a regular basis.
I treat the process of migrating Lightroom to a new computer as a multistep process where I address the different parts of the Lightroom setup separately.
How to Move Lightroom to a New Computer
The process of migrating Lightroom to a new computer can be broken down into 8 steps, two of which are optional.
- Step 1 – Install Lightroom
- Step 2 – Transfer the Photo Library to a new computer
- Step 3 – Move Lightroom Catalog from old computer
- Step 4 – Port Configuration and Settings
- Step 5 – Re-link the missing folders
- Step 6 – Migrate Lightroom Preset Library
- Step 7 – Bring Preview Files (optional step)
- Step 8 – Bring Catalog Backups (optional step)
When you address each component separately, the whole process becomes very logical and uncomplicated.
Step 1: Install Lightroom
Before installing Lightroom, you must install the Creative Cloud application on your new computer.
Login to your Adobe Creative Cloud account using web browser, download and install the Creative Cloud app.

After installing the Creative Cloud app, launch the desktop Creative Cloud application and navigate to All Apps section.
Next, deploy Lightroom Classic by hitting the Install button from the Creative Cloud app.

As you probably know, Creative Cloud allows you to install Lightroom on two different computers (Mac and PC). If you have already installed and activated Lightroom on two computers, you must go to the Creative Cloud web portal (Plans & Payment tab) and disconnect one of your installations.
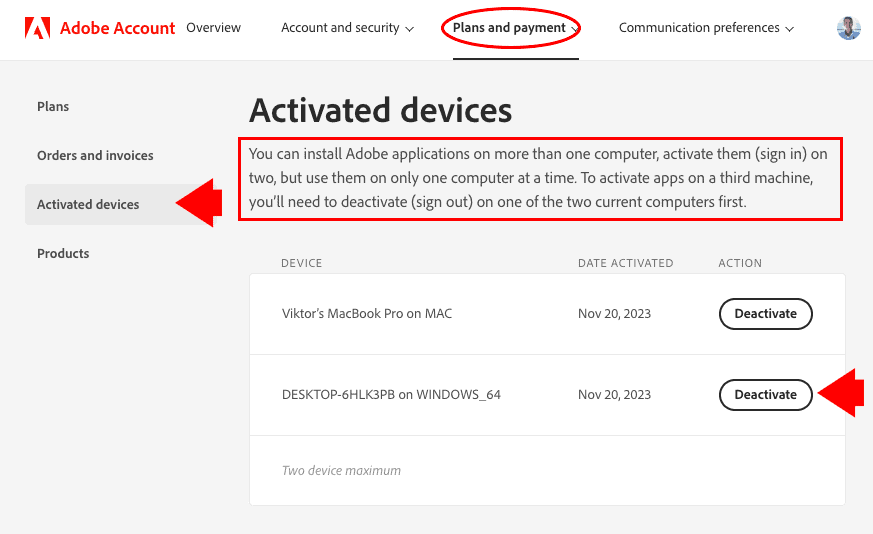
TIP: Make sure that you do not disconnect the computer from which you are currently performing the migration. You will need to access it multiple times throughout the migration process.
In my case, I have Lightroom activated on my PC desktop and on my Mac laptop (I am in process of switching from PC to Mac). When I start the migration process, I deactivate my PC Desktop installation so that I can use Lightroom on my Mac and new computers during the migration.
Step 2: Migrate Your Photo Library
Before you start moving your photo library to a new computer, make sure it is well organized.
I have a dedicated tutorial where I outline my Lightroom photo organization and library structure that I use in my photography. The idea behind

This organizational style makes it incredibly simple to back up your photos. It also makes it easy to move your entire library from one location to another.
You will have difficulty managing your library if your photos are scattered across different drives and directories.
Before starting the migration, I strongly recommend you conform your photo library to a one-directory structure.
TIP: Make sure to organize your library from within Lightroom using the Folders Panel in the Library Module. If you use Explorer (Win) or Finder (Mac) to move your image files around, Lightroom will not be able to track these changes.

Once your library is in order, use an external hard drive to copy your entire library to your new computer.
If you are migrating your Lightroom installation to a laptop with insufficient hard drive space, use an external hard drive to store your entire photo library. Make sure the external hard drive is high-speed and reliable. You can find some of my hard drive recommendations here: Best External Hard Drives for Photographers
Step 3: Migrate the Lightroom Catalog
The next step is to move the catalog file to a new computer. The Lightroom Catalog is a database where the application stores information about the photos and their organization.
Related: How to Export Lightroom Presets
It is not always easy to locate a catalog file because, sometimes, it is buried deep inside your computer’s installation folders. Fortunately, Lightroom provides us with a shortcut to an active catalog location.
How to Find Lightroom Catalog Location
Here are the steps to pinpoint the Lightroom catalog location:
From the top menu, select EDIT (Lightroom on Mac) > Catalog Settings… Go to the General tab and click the SHOW button. This will take you to the directory where the Lightroom catalog resides.

The Lightroom catalog has an .lrcat extension.


You will need to copy the catalog file to your new computer.
I highly recommend that you keep your catalog file on your fastest drive, preferably on a solid-state drive (SSD).
Step 4: Copy Configuration Settings
Lightroom combines all the settings, configuration files, and presets under the Lightroom Settings directory.
The directory contains a massive amount of information related to your Lightroom Catalog. It stores import and export presets, metadata presets, keyword sets, and so forth. If you do not import all the configuration information to your new installation, it can take weeks or even months to recreate it. Importing the directory is an essential step of the migrating process.
In my case, I use one catalog organization and all my configuration files are located next to my catalog file.

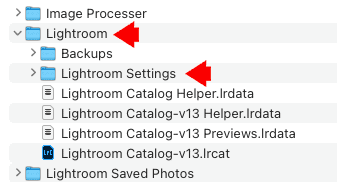
You must copy the entire Lightroom Settings folder to a new computer and place them in a new catalog folder.
Step 5: Re-link the New Catalog with the Photo Library
When you have completed the four previous steps, you are ready to launch your imported Lightroom Catalog on a new computer.
The chance that the file structure on your new machine is identical to your old one is very slim. This means that Lightroom won’t be able to find your photos because they are stored in a different location.
Related: My Top 15 Lightroom Workflow Tips
When you see a question mark next to a folder inside the Lightroom Library module, this means that it has no idea where to find them and that you need to re-link the missing folders to point them to a new image location.

The good news is that you do not have to do this for every folder. All you have to do is right-click at the top of the parent folder and point to the new location where you placed the photo library in Step 2. Lightroom will do the rest by mapping all the folders to their new locations.
Step 6: Migrating Lightroom Preset Library
After Adobe changed the format of Lightroom presets in 2018 from .lrtemplate to .xmp, the location of develop preset files on a computer hard drive is not always obvious.
Since XMP presets are shared between Lightroom and Photoshop, by default, presets are imported to Adobe Creative RAW (ACR) application. It makes sense because the presets can be accessed by Lightroom and Photoshop from a single location.
But if you change the Lightroom settings and check the box Store presets with this catalog (what I do), the imported presets will be stored next to the Lightroom catalog.

What it means is that Lightroom presets can be stored in different places on your hard drive. Sometimes, individual presets from the same group (collection) can be stored in various locations. It does not affect your workflow when you use preset-based editing but will cause a headache when you need to migrate your entire preset library to another computer.
Here is my solution.
Use the new Lightroom functionality ‘Export Group’ to export the entire preset group. Lightroom collects presets, even if they are located in various locations, and zip them into one single file.
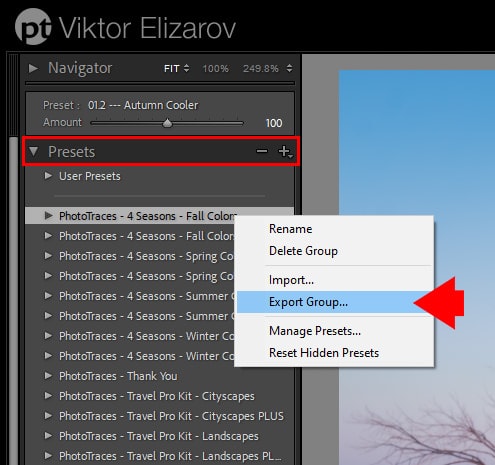
When you import them to Lightroom on a different computer, all the presets from the same group will be stored in one location.
It is a great way to clean up your preset organization.
Step 7: Migrate Previews (Optional Step)
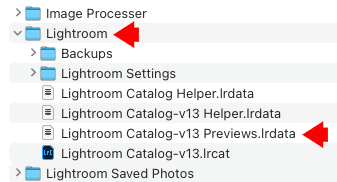
The way Lightroom works is that for each photo you import to catalog, it creates a preview file(s) or a JPEG version of your original image. Depending on your preferences, Lightroom might create a full-size JPEG version of your RAW file plus a smaller version if you use Smart Previews functionality. The preview files are an essential part of Lightroom’s non-destructive RAW workflow.

I know that many photographers copy their original preview files to a new computer, but I never do.
In Lightroom Preferences, you can specify how long you want to keep full-size previews before they are discarded. Because of the limited disk space on my primary SSD drive, I use the 30-day option. This means that if I do not use a particular image for longer than 30 days, Lightroom discards its preview.
But, I find that Lightroom does not manage this option very well. Over a period of months, the preview folder size grows out of control and I have to manually delete the previews to recover valuable disk space.
The migration process gives me an opportunity to start the preview generation process from scratch without importing any unnecessary files.
When I am finished with the migration, I can begin recreating preview files as I need them by using the manual method in Library Module.
TIP: Combine Steps 3, 4 and 5 into one
action
Since Lightroom stores the Catalog, Settingsand Previews inside the catalog folder, it makes sense to combine steps 3, 4 and 5 into a single move by copying the entire catalog folder with all its content to a new computer.
Step 8: Move Catalog Backups (Optional Step)
Lightroom has built-in functionality to back up the catalog files in case the master catalog is corrupt. This is critical because the catalog files contain years of accumulated information. If you lose it, it will be a disaster.
See also: How to Batch Edit in Lightroom
In my case, the backup process is set to a weekly schedule. However, you can configure it to a different frequency.
By default, Lightroom stores catalog backup files inside the Catalog folder.


But, it is highly recommended that you use a different location from your master drive where the catalog resides. The logic here is that if your master drive fails, you will have an intact backup on another drive.

While importing backup files to a new installation is recommended, it is not critical.
In the 12 years that I have used Lightroom, I have never had any issues with catalog files so I am not very paranoid in this regard.
When I complete the migration process and everything looks good, I create the first backup on a new computer, which is more than enough for me. Plus, I always have a few versions of the catalog backup saved on my Backblaze cloud.
FAQ: How to Move Lightroom to a New Computer
What if my new computer has a different operating system?
No worries if your new computer has a different system, like switching from Windows to Mac. I did it before, and it’s not a big deal. The settings in Lightroom (catalog, presets and configuration files) work smoothly on both systems, so you can easily move them without any issues.
Just remember, the Creative Cloud app and Lightroom installation are not universal. You need to install them based on whether your computer is a Mac or PC. After that, you can move your photos, catalog, and settings without any problems
Is it possible to move Lightroom to a new computer without an internet connection?
You initially need an internet connection to install the Creative Cloud and Lightroom applications from the Adobe website. However, once installed, you can move your existing Lightroom catalog, photos, and settings to the new computer without needing a constant internet connection.
How do I move my photos to the new computer without losing any edits?
To move your photos to a new computer without losing any edits, make sure to understand where your edits are stored. Depending on your Lightroom settings, edits are either stored in the Lightroom Catalog or as XMP files next to individual images, using the same file names.
To preserve your edits, transfer your old Lightroom Catalog and the entire photo library, including the original image files and any associated XMP files, to the new computer. This ensures that all edits are maintained when you open Lightroom on the new computer.
How to Move Lightroom to a New Computer | Conclusion
Moving the Lightroom Catalog to a new location is a serious undertaking and can be a disastrous experience if done wrong. But if you follow the outlined steps, the process will be painless and can be completed in no time at all!