Image masking is one of the most important functionalities of any photo editing program. Even though image masking implementation can vary from photograph to program, the concept behind the image mask is the same. Image masks allow us to use selective editing.
Let me explain.
When analyzing any photo, you can see that different regions have distinct characteristics and properties. It is unlikely to apply a series of edits to an entire photo and achieve the desired results. The only way to produce professionally-looking images is to edit different areas of the image separately using various tools and techniques.
This is when image masking comes into play.
Image masing helps us isolate (mask) specific areas of the image and leave unmasked areas available for editing.
What is Image Masking?
Image masking is a crucial technique in graphic design and photo editing, essential for tasks like compositing and selective editing. It lets designers and photographers edit only certain parts of an image while keeping the rest unchanged. Custom image masks help target specific areas in photos based on parameters like color, brightness, and objects or features such as people, animals, products, sky, or water.
Image masking has its roots in film photography. In the darkroom, photographers used to cover part of the photo paper, the one they did not want to be affected by the light coming from the enlarger. The process of concealing the area of the photo paper is called masking.
The concept of masking transitioned to digital photography, but instead of physical masks, we use digital tools to protect (mask) or reveal part of the image for selective editing.


Image Masking in Lightroom
When Lightroom was released in 2007, it did not have any image masking capabilities. The primary function of the program was photo organization. You could apply simple edits such as exposure, saturation to the entire image only; selective editing did not exist. To use selective editing with the help of image masks, you had to switch to Photoshop.
Over the years, Adobe introduced selective editing to Lightroom (Adjustment Brush, Graduated Filter, Radial Filter), but it was not even close to Photoshop’s masking capabilities.
The first big change happened in 2018 with the introduction of the advanced masking tools, the Range Mask. With new masking tools, photographers could selectively target areas of the image based on color and luminance values. It was huge. It changed the way I edited photos in Lightroom. It allowed me to perform 90-95% post-processing in Lightroom, and the need for Photoshop declined.
But the implementation of the Range Mask was not ideal. It had too many limitations. You could not create an image mask from scratch; you had to apply Adjustment Brush, Graduated Filter, or Radial Filter first and create masking after.
And finally, in October 2021, Adobe released Lightroom version 11, where they rebuilt and rearranged adjustment tools. The most significant change was the introduction of a dedicated Masking panel. Now, all the masking tools reside in one place, not dependent on any particular tool.


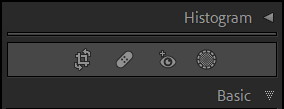

The editing workflow is straightforward now. You create multiple image masks targeting different image areas first. Next, you selectively edit those areas using editing sliders.


Types of Image Masking in Lightroom
All masking in Lightroom is a non-destructive process. It means that you never modify the original image, you always work on a JPEG preview.
For me image masking is one of the most important functions of Lightroom, I use it with every image I edit.
Let’s see what image masking tools we have in Lightroom today.
1. AI Image Masking: Select Subject
Adobe always lagged behind the competition, such as Luminar, with the development tools powered by artificial intelligence (AI). But it looks as if it is starting to change.
Lightroom introduced two new AI tools, and they are very effective.
To mask an image you simply press the button and the Select Subject AI tool analyzes the photo and identifies the main subject; next, it automatically creates a pretty accurate mask.
It is widely used for removing the background.


It is the perfect companion for portrait and product photographers.
They also introduced a new feature, the Invert Mask, a must-have for any image masking tool. After the main object is selected, you invert the mask and target the background of your photo with editing tools.
2. AI Image Masking: Select Sky
The Select Sky functionality is similar to the Select Subject, but instead of the main object, it identifies the area of the sky and creates a mask.


When you need to mask a sky, you press the button and the AI Select Sky tool does the rest.
The Select Sky tool works fast, and it is very accurate. It is much faster and more accurate than using the old-school approach targeting the sky with the Brush or Linear Gradient tools.
Once again, you can invert the mask.
Here is my workflow when using new masking tools. I click the Select Sky tool, and it automatically creates an image mask with the sky selected. Next, I duplicate the mask and invert the selection. Now, I can edit the area of the sky and foreground separately.
Priceless.


It is evident that the Select Sky tool is the perfect companion for landscape photographers.
The only negative I see with the Select Sky tool is it can not be used dynamically. I can not save it as a Lightroom preset to generate an image mask in any selected image dynamically.
I hope Adobe improves the functionality of the Select Sky in the future.
3. Brush Image Mask
The old Brush Adjustment tool is now called the Brush. It transformed from an adjustment tool to a pure masking tool.
Let me explain.
When using old Brush Adjustment, you could move editing sliders first and then start painting with the brush over the photo, visually applying selective edits. With the new Brush tool, you always start with the mask creation. And only when you are happy with the mask, you begin moving sliders applying desired effects to the isolated area.
With the introduction of the Select Object and Select Sky AI tools, the primary function of the Brush tool in my editing workflow is mask refining. If I am not fully happy with the masks created by the Select Object and Select Sky tools, I can fine-tune them with the Brush.


4. Linear Gradient Image Mask
The Linear Gradient is a new name for the old Graduated Filter tool. The tool transformation is similar to the Brush tool. From the adjustment, it transformed into a pure masking tool.
Now, I often combine the Select Sky with the Linear Gradient targeting area of the sky and making the top of the sky darker.


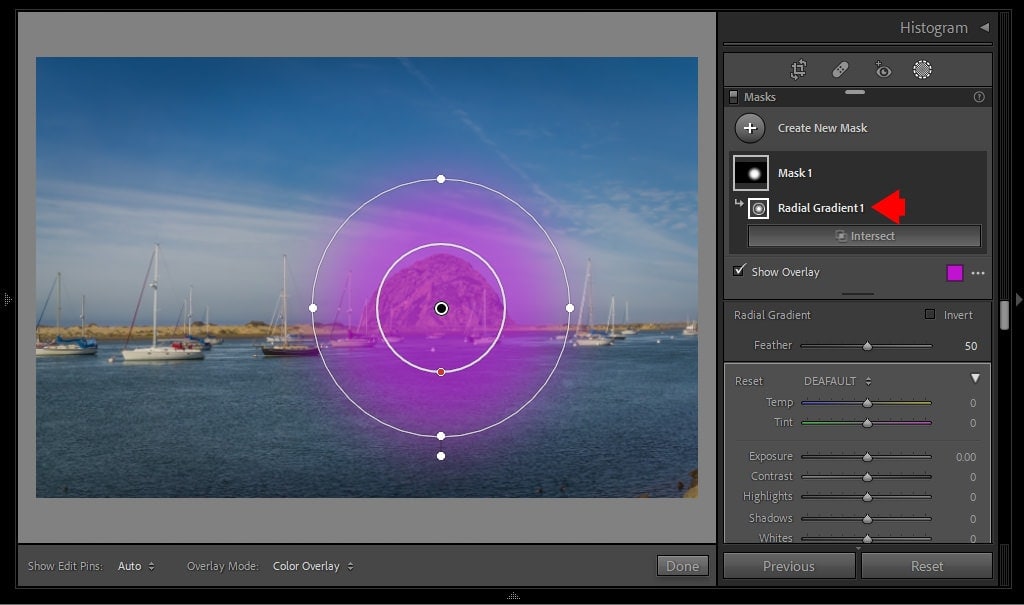
5. Radial Gradient Image Mask
The Radial Gradient follows the suite of the Brush and Linear Gradient tools. It has a new name; it is Radial Gradient now instead of Radial Filter. And it carries masking functionality now.
But the way you use it is very similar to the previous version. The only difference here is instead of one circle that indicates the selected area, there are two. The inner circle indicates where the opaque area ends, and the gradient starts.

6. Color Range Image Mask
The Color Range masking tool helps you create masks based on specific color values or range of colors.
Even though I often used the original Range Mask, it had too many limitations. First, it was attached to Brush, Linear Gradient, or Radial Gradient tools, and you only could modify the masks created by those tools. Of course, I had workarounds, but it felt as if implementation wasn’t well-thought.
Now, almost all limitations are gone. Both the Color Range and Luminance Range are separated and not dependent on any tools.
Huge improvement.


I often use the Color Range mask when editing the sky area in my landscapes. I target only the blue hues of the sky and keep bright regions of the clouds protected. And if I edit the sunset photo, I might create a separate Color mask targeting only orange and red hues of the sky.


But, it has the same limitation as the Select Sky image mask; you can’t use it dynamically. At least at this moment, it is impossible to incorporate the Color Range mask creation into Lightroom presets. It only works with the specific photo.
7. Luminance Range Image Mask
If the Color Range tool lets you create a custom mask based on the color values, then the Luminance Range tool generates masks based on the brightness (luminance) of the pixels.
The new Luminance Range masking tool is my favorite addition to the masking toolset. I use it most often in combination with the Select Sky AI tool.
For example, I use the Select Sky tool with the Invert option checked to select everything except the sky. Next, I use the Luminance Range to target the midtone pixels only. Now, I can boost the contrast without affecting shadows, highlights, and the sky.


And what is the most crucial feature of the new Luminance Range tool is it can be used dynamically. I already created a set of contrast presets targeting midtone values only. When I apply the preset to any selected photo, Lightroom creates an image mask on the fly based on the luminance values of the selected image.
8. Depth Range
Adobe introduced the Depth Range tool a while ago, but I was critical because of its very limited use. It only works with the new HEIC format, Apple’s proprietary version of High-Efficiency Image File format.
The Depth Range tool creates an image mask based on how close the part of the image to the camera. In theory, it is a great feature that allows you to selectively edit only the background area of the photo and keep regions close to the camera untouched.
The problem is that HEIC images with the depth map can be produced only using the iPhones with the dual camera starting with iPhone 7+.
Since I am an Android user, I have no use for this tool. But even if you have a new version of iPhone, you get better image quality when shooting RAW format (DNG) than HEIC.
9. Advanced Masking in Lightroom
With the introduction of eight new image masking tools, you have plenty of options for creating precise and sophisticated masks for selective editing. But you can take it even further with the new Add and Subtract features.
Now you can combine all the masking tools making selective editing even more flexible.
Here is a practical application of the Subtract feature.
To selectively edit the sky area, I use the Select Sky tool first. When Lightroom creates the mask, I hit the Subtract button. Next, I pick the Luminance Range tool and subtract the highlights from the existing mask created by the Select Sky tool. When I am done, I have the selection targeting only darker areas of the sky. I can selectively edit the sky without affecting the bright clouds.
The selected area of the image is highlighted in pink (you can change the color).
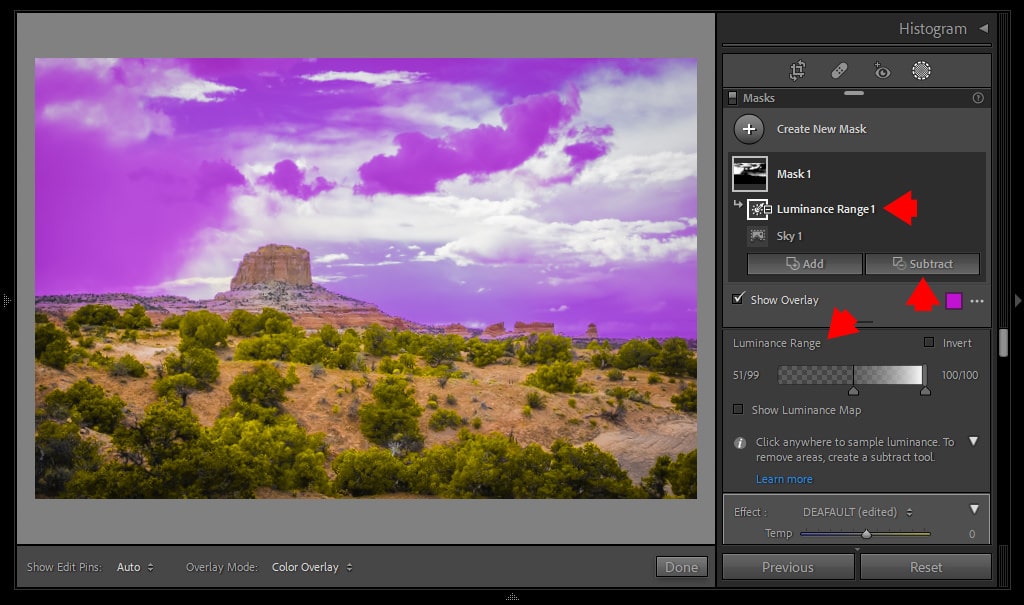

The Add feature mask works the same way, but you expand the mask instead of subtracting a portion of it. For example, you can use the Brush tool to expand the mask by painting over desired areas of the image.
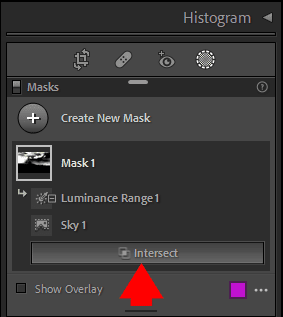
Plus, there is another masking feature I almost missed. It is the Intersect option. You enable it when pressing down the ALT key. It lets you create a masking selection by intersecting 2 masks.

The Shortcomings of Lightroom Masking Tools
I wish that Adobe made the Select Sky and the Color Range tools fully dynamic, as I mentioned above. But I believe it is a work in progress, and in the near future, they will improve the functionality of the masking tools. I will update my Lightroom Rapid Editing system when they do it by incorporating all the masking tools in my preset-based photo editing workflow. It will allow me to edit photos much faster and with higher precision.
In Lightroom, you can only edit one image at a time. There is no functionality to create a composite or collage.
But the main shortcoming of the new masking tools, the way I see it, is that after creating the desired mask, I do not have access to all the editing tools available in Lightroom.


For example, my favorite Lightroom editing tools are located in HSL/Color panel. They allow me to target individual colors selectively. I do not have access to the HSL/Color panel with the new masking tools. The same goes with the Tone Curve and Color Grading panels; they are unavailable when using the masking functionality.
It looks as if Adobe arbitrarily decided what tools I need and tools I do not. The issue would not exist if Adobe used the layer-based approach as it exists in most editing programs, including Photoshop. But, for some inexplicable reason, they refuse to give us layers in Lightroom, the main feature that made Photoshop so powerful.
Image Masking in Adobe Photoshop
I transitioned to photography from graphic design. For years, I used Photoshop as my primary editing and compositing tool as a graphic designer. And what I learned from my graphic design years is that to master Photoshop, you have to master how to create precise selections and masks.
Photoshop has a much more extensive selection of masking tools and is much more powerful compared to Lightroom.
This article aims not to teach you to use masking tools in Photoshop because it is impossible. But instead to give you an idea of masking options available in Photoshop. So you can decide if you need to learn Photoshop or Lightroom image masking tools will be sufficient.
1. Layer Masks
Photoshop is a layer-based program with an almost unlimited number of layers. And for each layer, you can have a dedicated transparency mask.
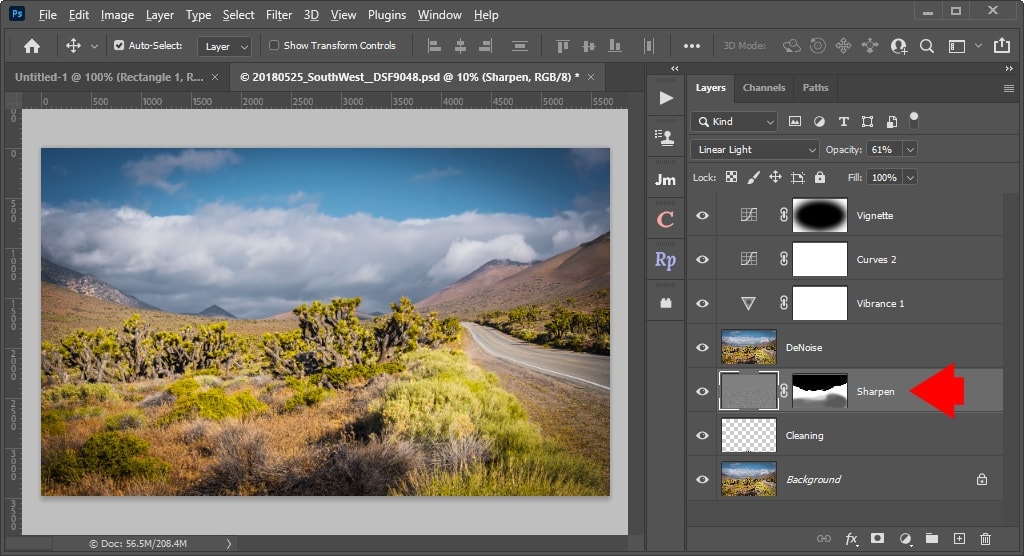

When you create a layer mask in Photoshop, you make part of the layer invisible.
Lightroom does not have layers, but you can have multiple masks attached to any photo you edit.
2. Vector Layer Masks
The vector layer masking functionality allows you to create resolution-independent masks in Photoshop. This feature does not exist in Lightroom, but it is rarely used in photo editing.
I only used vector layer masks when working with high-resolution images intended for print. I never felt the need for vector masks in my photography.
3. Adjustment Masks
Adjustment layers are nondestructive edits you can apply to any layer in Photoshop. And for each adjustment layer, you have a transparency mask. Original adjustment tools in Lightroom (brush, graduate filter, radial filter) worked precisely as adjustment layers in Photoshop. With the latest revamping of masking tools in Lightroom, they work slightly different but still comparable to adjustment layers and masks in Photoshop.


4. Clipping Masks
Clipping masks in Photoshop let you control transparency masks in one layer based on the content of another layer. The functionality is widely used in graphic design and image compositing. Such a feature is not possible in Lightroom because it has no layers. But you won’t miss it if you are only interested in photo editing.
5. Alpha Masks
Alpha Mask is an advanced type of mask and a very powerful selection tool in Photoshop. The masking information is stored in one of the image’s color channels (alpha channel) and can be accessed by various programs outside of Photoshop.


When I was working as a graphic designer producing graphics for broadcast television, 80% of my time was spent creating sophisticated alpha masks in Photoshop. It allowed overlaying multiple images on a TV screen, preserving transparency in different parts of an image.
Even though it is a powerful feature, you do not miss it when processing photos. And there is no such a feature in Lightroom
6. Select Sky
The Select Sky tool is powered by artificial intelligence and machine learning. It detects and selects the sky area with precision and accuracy. I am certain the tool uses the same algorithm as the Select Sky tool in Lightroom. Both tools produce similar results.


7. Select Object
The same goes with the Select-Object tool, which is powered by AI and very similar to how it works to the Select Object tool in Lightroom.
8. Color Range
The Color Range is a very useful method of masking. You can create custom masks based on a specific color or range of colors in any given image. For a long time, I missed such functionality in Lightroom. However since Adobe introduced the Color Range in Lightroom in version 8, the need for Photoshop color masking capabilities disappeared.
9. Luminosity Masks
I believe the implementation of Luminance Range in Lightroom is more user-friendly and logical than Photoshop’s Luminosity Masks. In Lightroom, you can create a custom mask based on luminance (brightness) values in seconds. In Photoshop, it is more powerful but much more complicated. Stick to Lightroom.


As you can see, even though Photoshop is a much more powerful and feature-rich program, the need for Photoshop in photo editing diminishes fast. And with regards to image masking functionalities, I do not see a massive advantage of Photoshop over Lightroom.
Plus, to fully take advantage of Photoshop advanced features, you need to rasterize images first. In Lightroom, you can stay in a RAW editing environment taking advantage of nondestructive editing.
Image Masking in Photo Editing: Conclusion
I’ve been expressing concerns about Adobe’s lack of real innovation in Lightroom over the past few years, feeling that many competitors were ahead. However, with the introduction of new image masking tools, there is hope that Adobe has finally recognized the need for innovation. This suggests that image masking can help bring truly innovative tools and features to Lightroom.

